Building and compiling code can take a huge hit on our time and resources. If you have dockerized your application, you may have noticed how much of a time-saver Docker cache is. Lengthy build commands can be cached and not have to be run at all! This works great when you’re building on a single host; however, once you start to scale up your Docker hosts, you start to lose that caching goodness.
In order to take advantage of Docker caching on multiple hosts, we need a multi-host cache distribution system. Our requirements for preserving a single-tenant infrastructure for our customers meant we needed a horizontally scalable solution. This post will go through some methods we considered to distribute Docker cache across multiple Docker hosts.
Everyday Example
First, let’s look at how Docker cache can affect builds with this simple example:
FROM node
RUN apt-get update && apt-get install curl vim -y
ADD ./package.json /package.json
RUN npm install
ADD . /nodejs-app
CMD npm start
Running docker build for the first time produces the following:
scripts$ docker build .
Sending build context to Docker daemon 50.09 MB
Step 1 : FROM node
 ---> 708e372a5f46
Step 2 : RUN apt-get update && apt-get install curl vim -y
 ---> Running in 50dfd682678d
Get:1 http://security.debian.org jessie/updates InRelease [63.1 kB]
# ... Time passed
Processing triggers for libc-bin (2.19-18+deb8u4) ...
 ---> 0fc75922c6d2
Step 3 : ADD ./package.json /package.json
 ---> 042ad2a02487
Step 4 : RUN npm install
 ---> Running in aada9b1e6ff0
npm info it worked if it ends with ok
# ... Resources used
npm info ok
 ---> e14b9bc77d41
Step 5 : ADD . /nodejs-app
 ---> 36286c4d2f21
Step 6 : CMD npm start
 ---> Running in b6b558c42604
 ---> 38fbb662b182
Successfully built 38fbb662b182
Re-building on the same host with no changes shows Docker cache in action:
scripts$ docker build .
Sending build context to Docker daemon 50.09 MB
Step 1 : FROM node
 ---> 708e372a5f46
Step 2 : RUN apt-get update && apt-get install curl vim -y
 ---> Using cache
 ---> 0fc75922c6d2
Step 3 : ADD ./package.json /package.json
 ---> Using cache
 ---> 042ad2a02487
Step 4 : RUN npm install
 ---> Using cache
 ---> e14b9bc77d41
Step 5 : ADD . /nodejs-app
 ---> Using cache
 ---> 36286c4d2f21
Step 6 : CMD npm start
 ---> Using cache
 ---> 38fbb662b182
Successfully built 38fbb662b182
In the example above, you can see apt-get update && apt-get install curl vim -y and npm install were cached (meaning they didn’t need to run). This saves considerable time, network, and compute resources for those who have several packages to install. This is a short example, but most Dockerfiles have many more dependencies installed before application code is added. You get all the caching goodness when all builds are run on the same host. The problem is if this host goes down, or if this build is run on a different host, you’re going to have to wait for the full build. You can read more about Docker caching in the documentation.
How do we get this wonderful Docker cache to all of our build servers?
Copious Caching
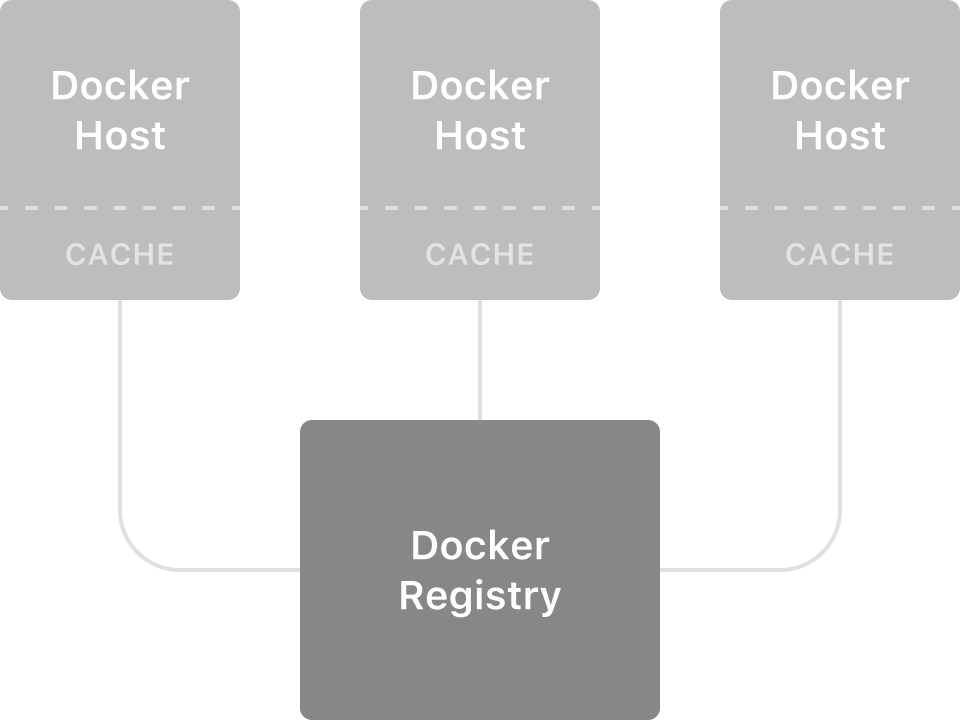
Before Docker version 1.10, distributing cache was easy with the Docker registry. We ran a Docker registry container on each host backed by an S3 bucket. After every build, we pushed the image to the registry:
docker push IMAGEOnce the image was pushed, we pulled that image down on other Docker hosts.
docker pull IMAGEAfter the pull completed, Docker would automatically use those image layers when looking up its cache.
Docker 1.10 changed the way its images and image layers are addressed. This change removed the parent chain, meaning a simple docker pull no longer primed the build cache.
Luckily Docker 1.11 gives us a solution with docker load and docker save. docker save IMAGE [IMAGE...] creates a tarred repository for a given image. In order to recreate the cache, we have to pass all layers referenced by the image to the save command:
docker save <IMAGE> $(docker history -q <IMAGE>) > image.tarThe image.tar file now contains the image and its dependent layers. Note that you’ll have to pass the image name with its history if you want to preserve the name of the image.
To load this image in Docker’s cache, we need to use the docker load command:
docker load < image.tarNow, we have to distribute these images across Docker hosts. We came up with the following methods:
Method #1: Direct Transfer
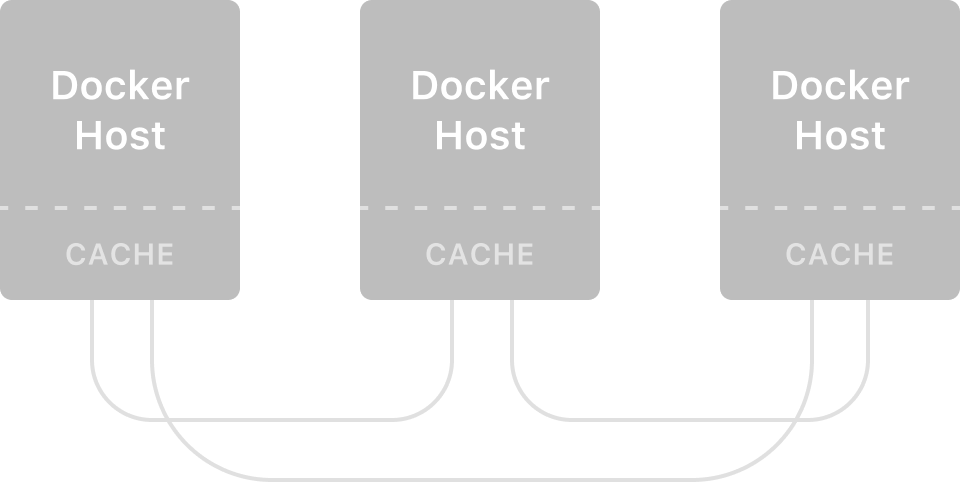
We can directly transfer these images from host to host. Since the output of docker save is a stream, and docker load can also take in a stream, we can simply pipe the streams together. Note that the target Docker engine must be exposed on a port and that port must be accessible by the sending Docker engine.
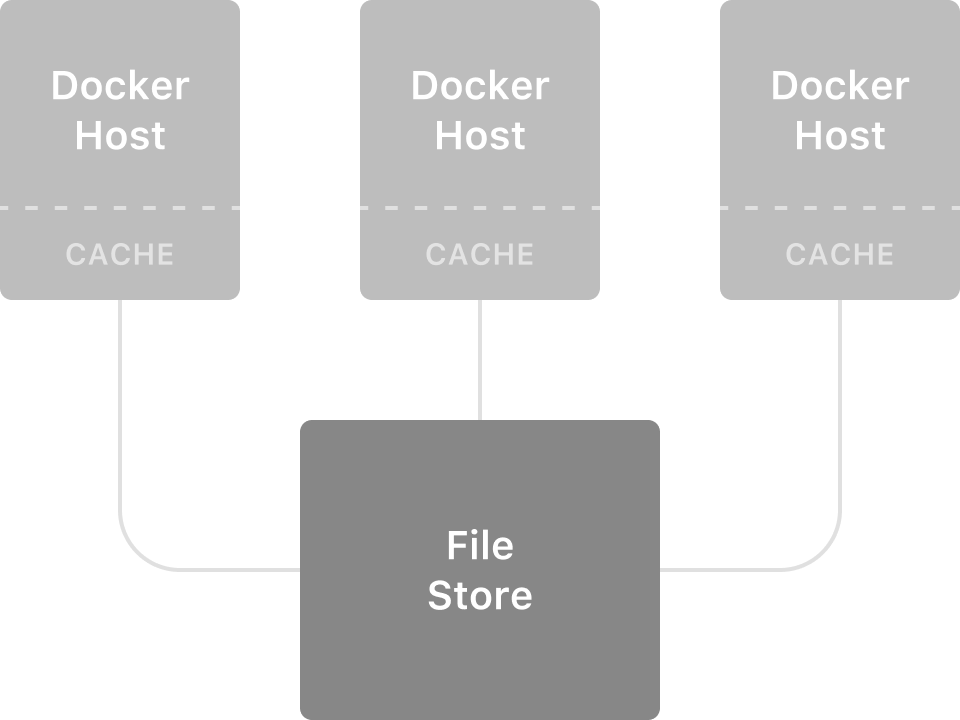
docker save <IMAGE_NAME> $(docker history -q <IMAGE_NAME>) | docker -H tcp://REMOTE_HOST:REMOTE_PORT loadMethod #2: Distributed File Store
The above method works great when you have a static list of hosts, but maintaining that list becomes harder when you have ephemeral hosts. To better handle dynamic hosts we thought of a distributed file store solution. In this method, we’d start by saving these images as files, and then distribute them across all Docker hosts, and finally load this file into the Docker engine.
Step 1: On the Docker host where the image was first built, we convert the image to a tar file:
docker save <IMAGE_NAME> $(docker history -q <IMAGE_NAME>) > /shared/image.tarStep 2: We now can distribute image.tar by using one of the many file distribution methods available today. Some methods of distributing images are Amazon’s S3, Amazon’s EFS, and Bittorrent Sync.
Step 3: Once the tar is distributed, we load it on the remote host:
docker load < /shared/image.tarPreserving Potency
Now that we know how to distribute images, we need to know when to update cache across the hosts. Distributing cache on every build is not desirable since most builds typically break the cache after the ADD or COPY line, where code is introduced.
We applied an optimization to fix this problem: we parse the build logs and only distribute cache if there was a cache break in a line before an ADD or COPY statement. In an auto-scaling system, we pre-load all images on the new host before it comes into rotation. While this tends to use more disk space, we keep it in check by running a cron job to remove old images.
Future Fixes
The registry method was the ideal way to transfer images and cache. From this issue on GitHub, it looks like there are many people who agree. It’s possible that it might be brought back into the registry with certain flags; but in the meantime, we’ll continue to use the docker load and docker save method as part of our cache distribution.